I wish I was as smart as our Paraprofessionals (Tara, Olivia) and COTA (Erin) at the school I work at! They demonstrated at a training how they have been creating Albums to show sequences of tasks or events, scheduled tasks (yes, just like using a visual schedule) for students using photos taken on the student iPads with iOS 5. Although we have some First Then apps on some of the iPad, not all of the devices were provided the app. But being the mother of necessity they created their own way of producing a visual sequence of photos for their students.
How did they do that?? Clever, but easy…
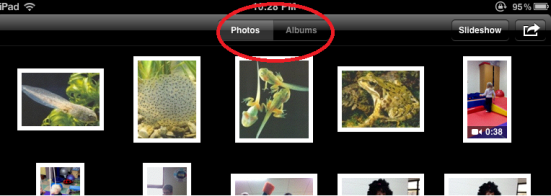
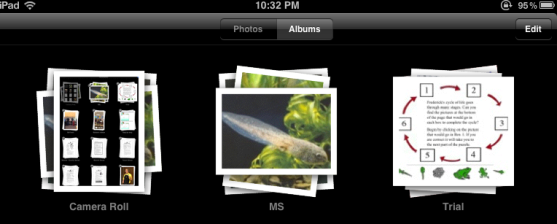
In your Photos icon using iOS5, you have the availability of viewing pictures in Photos or Albums. Select or tap on Albums.
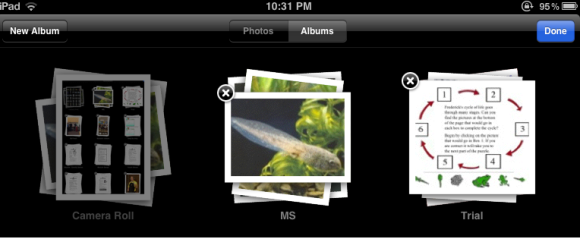
When Albums is selected, an Edit button becomes available. Tap the Edit button.
After tapping the Edit button, a New Album button appears on the top left of the screen.
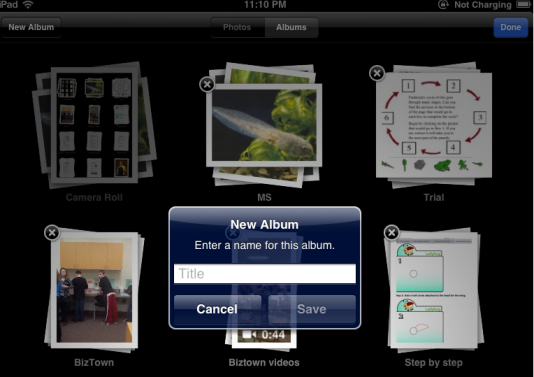
Tap or select the New Album button. A dialogue box allows you to name your New Album.
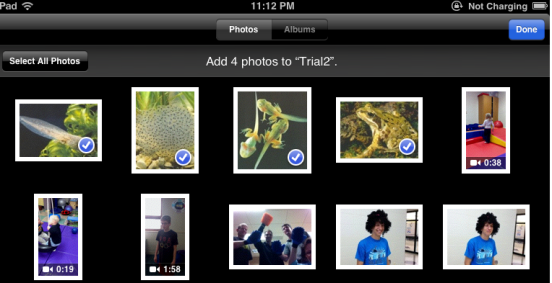
After creating a New Album, you are prompted to “Add photos to your New Album. Tap or select Photos button and tap or select the pictures you want added. Photos are copied and not cut from your Photos library. When you have selected all you need, tap Done.
Your selected pictures will be collected or stacked in the named Album. To review, tap on the first picture of your Album and they will be ready to view in the order you selected them. You can also play them like a slide show if appropriate. Paraprofessionals take picture of the scheduled activities, work tasks and name the New Album (Wednesday PM, Thursday AM) creating a visual sequence of activities to present to the student. It does not have as many features as an app as First Then, but it sure can get the job done!
I also like creating Albums with groups of worksheets or handouts of a theme or activity type that I may have found on the Internet. Taking screen shots of online free materials I might use with some students provide easy access, organization and display on my iPad without carrying around folders and hard copy paper.
A great tip from our support staff at school!
Adding to your OT iTool Kit!
Carol


Hello Carol, I really enjoy your posts and always learn something new which is fantastic. Can I ask how you take screen shots of the free online resources/ worksheets using iPad.
Thanks for taking the time to respond
Fiona Tipping
(Occupational Therapist)
Fiona,
Hopefully you received my email and if not here’s how you do a screen shot on your iPad. Press the home (bottom button) at the same time as the power bottom (at the top). You will see a flash and hear a camera click (if your volume is on). The image will be sent to your Photos. From there you can import that photo into other apps for its use (such as Doodle Buddy, some of the PDF apps (Type on PDF Free, Notability), Your Whiteboard to draw on, crop or use for a communication or visual schedule app, type on or even import it into an organizing tool as Awesome Note, or a group of them into Photos for an Album.
I use some screen shots from a book I bought for my Kindle – which I view or read in my iPad Kindle app, then take screen shots of specific pages as they have some sensory checklists and info I use with some of my older kids with sensory issues. In stead of scanning or copying them (this is so much easier), the screen shot trick takes picture of each page, puts them in my Photo icon/app then I grouped them in an Album by chapter/topic in my iPad for easy retrieval and use or even completion of some checklists by older students I have if I brought them into other apps where you can draw/write.
What did we do before we had iPads? carried around folders and binders (I still do that, but am trying to decrease the load!). There are many apps such as Notability that you can import photos, web clips, screen shots or take a photo from, then organize the information by subject.
Hope that helps.
Thanks for visiting!! Come back and share how you use screen shots- there is a ton of uses.
Great trick to know for your OT iTools Kit.
Carol
Pingback: Weekly Share: Some OT blog posts this week | Therapy Fun Zone
Pingback: Therapy Fun Zone Community – Weekly Share: Some OT blog posts this week
I am wanted to make one of these with the pictures of the really items or areas but I dont have a camera on my ipad. Is there a way to import pictures if I take them with a camera? Thanks so much for you help and I love the posts.
Jackie,
There are a couple of ways to transfer photos to your iPad 1.
One requires an iPad Camera Connection Kit which allows you to use a SD card inserted to connect a camera to the iPad using the connector. Here is a link to instructions for how to do that:
http://www.ipadshouse.com/how-to-import-photos-and-videos-to-your-ipad-using-the-camera-connection-kit/
A second way is to import pictures from folders on your hard drive through your iTunes account. Here are step by step instruction of how to do this. It is not hard. I would suggest putting just the pictures you want to sync or transfer to your iPad in a folder, name it something you remember. That will allow you easier control of what you transfer rather than transferring tons of photos you don’t want taking memory space on your device and more clutter to deal with. If you can try to update your iPad1 to the current iOS 5 – that will allow you the ability to organize groups or albums of pictures on your device.
Hope that helps!
Carol
Thank you so much for your help. I am happy you understood what I was asking. I was in a hurry when I posted that and when I went back and read it I was suprised what I had put in there. Thanks again.
Jackie, Thanks for visiting and hope it helped. Come on back and visit. If you have any ideas, please share!!
Carol